A failed npm install can stall a deploy, break a CI run, or block a hotfix when time is tight. The errors look familiar, missing dependencies, permission issues, corrupted caches, yet the cause often is not obvious. Guessing wastes time and risks shipping with half-fixed workarounds.
This guide is written from the operator’s side of the keyboard. It pulls from common failure patterns seen in real pipelines, cross-checked against npm’s own behavior and documented edge cases. The goal is not theory, it is faster diagnosis.
You will learn how to read npm errors with intent, isolate the root cause, apply the right fix, and confirm the install is stable. If npm install keeps failing and you need it working now, start here.
Here are three easy steps to install a specific npm version:
Step1: Identify the version: Determine the version number you need.
Step 2: Install the specific version: Run npm install [package-name]@[version-number] to install or update to specific version.
Step 3: Verify installation: Use npm list [package-name] to confirm the installed version.
Following these steps will help you manage your project’s dependencies effectively. For additional stability and performance monitoring, consider integrating a reliable uptime monitoring solution.
Install a specific npm version using the command line
- Run the command:
npm install [package-name]@[version-number]This command will install exact version of npm package you want, alongside any packages it depends on.
- Example:
npm install renovate@20.5.1 This will install version 20.5.1 of the renovate package.
- Shortened version:
You can also use the shorthand:
npm i renovate@20.5.1The above commands will install renovate locally.
- Global Installation:
To install the package globally, simply add the -g flag:
npm install -g renovate@20.5.1This ensures the package is available system-wide, rather than just in your local project.
Install a specific npm version using package.json
- Open the package.json File:
Navigate to the root directory of your project and open the package.json file.
- Locate the Dependencies Section:
Depending on whether the package is for production or development, find either the “dependencies” or “devDependencies” section.
- Add or Update the Package Version:
Specify the desired version of the package. For example:
“dependencies”: {
  “lodash”: “4.14.1”
}
This ensures that version 4.14.1 of the lodash package is installed.
- Save the package.json File and open your command-line interface (CLI).
- Navigate to Your Project’s Root Directory and run the following command:
npm installThis will read the package.json file and install the specified versions of the packages listed under the “dependencies” and “devDependencies”sections.
Install a specific npm version using Yarn CLI
- Open Your Command-Line Interface (CLI):
Navigate to your project’s root directory or the location where you want to install the package.
- Run the command:
yarn add <package-name>@<version>Replace <package-name> with the name of the package and <version> with the desired version. For example:
yarn add lodash@4.17.21This installs version 4.17.21 of the lodash package.
- Wait for Installation:
Yarn will fetch the specific npm version and its dependencies, completing the installation.
Install a specific npm version from GitHub
To install packages from GitHub Packages, follow these steps:
- Ensure package.json Exists:
Make sure your project has a package.json file. If not, create one to manage dependencies.
- Authenticate GitHub Packages:
Authenticate using the appropriate method to ensure you have permission to access the package.
- Configure .npmrc:
Create or edit a .npmrc file in the root directory (where package.json is located) and add this line:
@NAMESPACE:registry=https://NPM.pkg.github.comReplace NAMESPACE with the GitHub account or organization that owns the repository.
- Add the .npmrc File to Your Repository: This ensures GitHub Packages can locate and use the configuration.
- Update package.json: In the “dependencies” section of your package.json, specify the GitHub package and version, like so:
"dependencies": {
 "@ORGANISATION_NAME/PACKAGE_NAME": "1.1.4"
}- Run the Installation:
Use the following command to install package version and its dependencies:
npm installThis process lets you install specific package versions from GitHub Packages, ensuring your project is always using the correct versions.
How to know which package versions are available
Option 1:
Search for the package on the NPM public registry to view all available versions.
Option 2:
Run the following command to check all available versions on the NPM registry:
npm view [package-name] versions
To find the latest version of a package, use:
npm view [package-name] version
How to install an older version of an npm
If you need to install an older version of a package, perhaps to resolve compatibility issues or bugs, you can easily do so using the @ syntax. This process is identical to installing any specific version of a package.
npm install [package-name]@[version-number]Simply replace [version-number] with the version you need, and NPM will install the older version of the package.
How to use semantic versioning to specify package versions
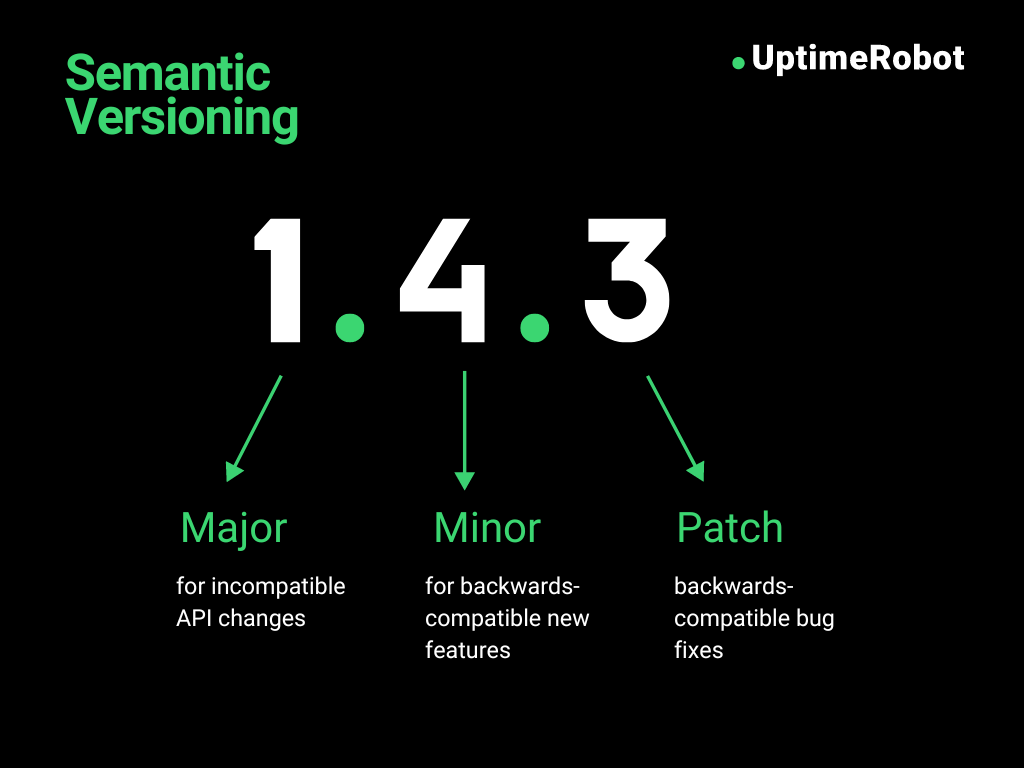
Semantic Versioning (SemVer) is a system that NPM uses to version packages. Each version consists of three numbers: major.minor.patch (e.g., 24.42.1), representing major changes, minor updates, and patch fixes, respectively.
NPM allows you to use SemVer symbols to specify which version range to install:
- Caret (^): Installs the latest minor version.
For example, the command:
npm install [package-name]^20.0.0This fetches the highest minor version under 20.x.x, such as 20.25.9.
- Tilde (~): Installs the latest patch version.
For example:
npm install [package-name]~23.14.0This fetches the latest patch under 23.14.x, such as 23.14.8.
These symbols help keep your packages up-to-date with minor improvements and security patches while maintaining compatibility.
Why it’s important to install specific versions
Let us look at a few important reasons why you should install specific versions of Node and NPM packages:
- Code Sharing: Specific versions enable easy sharing and collaboration among developers worldwide, speeding up the development process.
- Testing: Installing specific npm versions allows developers to manage and test multiple code versions, helping identify the best fit for their projects.
- Performance Optimization: By controlling versions, developers can implement minor updates to maintain optimal software performance.
- Seamless Rollouts: Installing specific versions ensures smooth rollouts of improvements, allowing enhancements without disrupting the user experience.
- Stability: Newer versions may introduce bugs or breaking changes. Using a known stable version can prevent unexpected issues.
How to check available versions of an npm package
To view all available versions of an NPM package, use command:
npm view <package-name> versionsFor example, to see the available versions of the express package, run:
npm view express versionsThis will list all versions, such as 4.16.4, 4.17.1, 5.0.0, etc., helping you decide which version to install or verify if you have the latest one.
To view the latest stable version of a package, use:
npm view <package-name> versionFor example:
npm view react versionThis command will output the latest stable version, such as 18.2.0 for react.
How to use semantic versioning for package versioning
Semantic Versioning (SemVer) is a structured versioning scheme that follows the format: MAJOR.MINOR.PATCH. Each segment of the version number conveys specific information:
- MAJOR version: Increment this when you make incompatible API changes or introduce major new features that break backward compatibility. For example, moving from 1.0.0 to 2.0.0 indicates significant changes that might not be compatible with previous versions.
- MINOR version: Increment this when you add new features or functionality in a backward-compatible manner. For example, changing from 1.0.0 to 1.1.0 means new features have been added without breaking compatibility.
- PATCH version: Increment this for backwards-compatible bug fixes or minor improvements. For example, updating from 1.0.0 to 1.0.1 signifies that only minor changes or bug fixes were made.
Specifying Version Flexibility
When specifying package versions in your package.json file, you can use semantic versioning operators to define the acceptable range of versions:
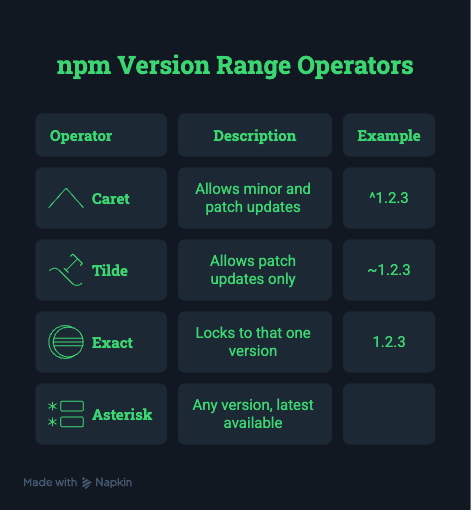
- Caret (^): Allows updates that do not change the left-most non-zero digit.
For example, ^1.0.4 allows updates to any 1.x.x version, but not to 2.0.0. - Tilde (~): Allows updates that do not change the left-most digit specified.
For example, ~1.0.4 allows updates up to 1.0.x, but not to 1.1.0. - Equal (=): Specifies an exact version.
For example, =1.0.4 only allows that exact version. - Asterisk (*): Allows any version.
For example, * allows updates to any version, which can be useful for testing or in environments where version constraints are not critical.
Examples of Version Ranges
- For patch releases: Use 1.0 or 1.0.x or ~1.0.4 to allow updates up to version 1.0.4.
- For minor releases: Use 1 or 1.x or ^1.0.4 to allow updates within the 1.x.x range, but not to 2.0.0.
- For major releases: Use * or x to allow any major version updates, such as ^1.0.4 allowing updates within the 1.x.x range, or * allowing any major version.
Semantic versioning helps ensure clarity and compatibility when managing dependencies, allowing you to understand the impact of version updates at a glance.
Best practices for installing specific npm versions
To keep your project stable and secure, it is important to efficiently manage npm packages and their versions. Following these best practices will help everything run smoothly and stay current. Here are some simple tips to help you install specific version of npm effectively.
- Getting help
Use npm help <command> to get information and usage details for any NPM command.
- Starting new projects with NPM init
Use npm init –yes to create a package.json file with default values quickly.
- Finding NPM packages
Use websites like npmjs.com to explore, evaluate, and compare NPM packages based on quality, popularity, and maintenance metrics.
- Using Package Lock Files
Use package-lock.json to lock dependencies to specific versions. This ensures that all team members and environments use the same versions, avoiding inconsistencies.
- Regularly check for updates
Regularly check for outdated packages with npm outdated to stay current with updates and patches.
- Use versions wisely
Specify version ranges in package.json to control the level of flexibility for updates (e.g., ^ for minor updates, ~ for patch updates).
- Security practices
Run npm audit to check for security vulnerabilities in your dependencies and npm audit fix to automatically fix issues.
- Keep Documentation Updated
Maintain clear documentation of the dependencies and their versions used in your project, including any specific installation instructions or version constraints.
How to install and run a specific npm package version using npx
Using npx is a quick way to run a specific version of an npm package without installing it permanently in your project. This is useful when you want to test a certain version, compare behaviors, or execute one time commands without modifying your dependencies.
Run a specific version directly
The simplest approach is to call the package and version in the same command:
npx <package-name>@<version>Example:
npx create-react-app@5.0.1 myappThis runs version 5.0.1 of create-react-app even if your system has a different version installed globally.
Why use npx for version specific commands
Using npx ensures that:
- You always run the exact version you specify
- You avoid conflicts with global installations
- You can test older or newer versions without changing your project
This is especially useful for CLI tools, scaffolding tools, or scripts that update frequently.
Running npx with a local install
If the package is already installed locally in your project, npx will use that version by default. To force a specific version instead, simply include it in the command:
npx eslint@7.32.0 .This runs ESLint version 7.32.0 even if your local project uses a different version.
Running npx without saving to dependencies
Because npx does not add the package to your package.json, it is ideal when you want to:
- Avoid dependency bloat
- Run one time tools
- Test packages before adding them permanently
If you later decide to install the same version permanently, you can still use:
npm install <package>@<version>Forcing a clean download
If you want to ignore cached versions and fetch the package freshly from the registry, use:
npx --ignore-existing <package>@<version>Example:
npx --ignore-existing typescript@4.9.5 --versionThis ensures you run TypeScript 4.9.5 even if a different version exists on your system.
How to choose between npm install and npx
Developers often wonder whether they should install a package with npm install or simply run it once using npx. Both methods are valid. The right choice depends on how often you plan to use the package and whether you want it saved inside your project.
When to use npm install
Use npm install when you want the package to become part of your project’s dependencies. This ensures that everyone on your team will use the same version and that the package is available for reuse at any time.
Choose npm install when:
- The package will be used frequently
- You want to lock the version in
package.json - Your CI or production environment needs the package
- You want predictable builds across machines
Example of installing a specific version:
npm install eslint@8.56.0This adds ESLint to your dependencies or devDependencies depending on how you install it.
When to use npx
Use npx when you only need to run a tool once or do not want to save the package in your project. npx downloads the package temporarily, executes it, and removes it afterward.
Choose npx when:
- You want to run a command without installing it
- You want to test a specific version before deciding to install it
- You need to use older or newer versions without affecting your project
- You want to avoid global installations
Example:
npx eslint@8.56.0 .This runs ESLint version 8.56.0 directly without adding it to the project.
Choosing the best option for your workflow
A simple rule helps you decide:
- If you need repeatable use across your team, choose npm install
- If you need a one time command or want to try a version quickly, choose npx
Many developers use both approaches. They test versions with npx, then lock the correct version with npm install once they know it works for their setup.
Installing a specific npm version globally vs locally
When working with npm, you can install a package either locally in your project folder or globally on your system. Both approaches work, but they serve different purposes and affect your workflow in different ways. Understanding the difference helps you choose the right installation method for your use case.
Local installation (recommended for most projects)
A local installation stores the package inside your project’s node_modules directory. This keeps your environment consistent across all machines that work on the same codebase.
Install a specific version locally:
npm install <package>@<version>Example:
npm install typescript@4.9.5This makes TypeScript version 4.9.5 available to your project only.
Advantages of local installation
- Ensures reproducible builds
- Prevents version conflicts across projects
- Keeps project tools aligned between team members
- Works smoothly with CI systems, Docker, and deployment pipelines
- Allows multiple projects to use different versions of the same package
Disadvantages of local installation
- Does not make the package available system wide
- Command line tools must be run through
npx,npm scripts, or the node_modules path
Global installation (for system wide tools)
A global installation makes the package available everywhere on your system. This is useful for tools you use across multiple projects, such as CLI utilities.
Install a specific version globally:
npm install -g <package>@<version>Example:
npm install -g nodemon@2.0.7This lets you run nodemon from any directory.
Advantages of global installation
- Convenient for command line tools you use frequently
- Saves time when running utilities across multiple projects
- Does not require adding the package to your project dependencies
Disadvantages of global installation
- Different machines may end up with different versions
- Can cause compatibility issues if a local project expects another version
- Harder to track in version control because it is not part of
package.json - Updating global versions may break older projects
How to choose between local and global installation
A useful guideline is:
- Install locally when the package is part of your application or build process
- Install globally when the package is a general purpose CLI tool you want available everywhere
For most development environments, local installation provides more stability and reduces unexpected issues caused by version mismatches. Global installation is best reserved for tools you trust and use daily.
How to install or downgrade to a specific Node.js version using nvm
Sometimes a package requires an older or specific Node.js version to work correctly. In these cases, the simplest and safest way to manage multiple Node versions is by using nvm (Node Version Manager). It lets you install, switch, and test different Node.js versions without affecting your system installation.
Check if nvm is installed
First, verify whether nvm is already available on your system:
nvm --versionIf you see a version number, you are ready to continue.
If not, follow the installation instructions for your operating system at the official nvm repository.
Install a specific Node.js version
To install a specific version of Node.js, run:
nvm install <version>Example:
nvm install 16.20.2This downloads and installs Node.js version 16.20.2 on your machine.
Switch to the installed version
Once the version is installed, activate it with:
nvm use <version>Example:
nvm use 16.20.2This sets your current shell session to use Node 16.20.2.
Set a default Node.js version
If you want a specific version to be used every time you open a new terminal, set it as the default:
nvm alias default <version>Example:
nvm alias default 18.19.1This is useful when working with long term maintenance releases or older projects.
List available and installed Node versions
View all versions installed on your machine:
nvm lsView all versions you can install from the Node.js repository:
nvm ls-remoteThis helps you decide which version to install or downgrade to.
Why use nvm for downgrading Node.js versions
Using nvm provides several advantages:
- No need to uninstall your existing Node.js installation
- Ability to switch versions instantly
- Ideal for testing compatibility with older package releases
- Safe way to work with multiple projects on different Node versions
- No impact on system level dependencies
Example workflow for downgrading Node.js
A common use case is running a project that only supports an older version of Node.js, such as version 14. Here is how you would downgrade:
nvm install 14
nvm use 14
You can then run your project or install specific npm package versions that require Node 14.
Once you are done, switch back to a newer version:
nvm use 20This flexibility is one of the main reasons many developers rely on nvm for version management.
Troubleshooting common issues
When working with NPM, you might encounter various issues that can disrupt your development process. Here are some common problems and their solutions to help you troubleshoot effectively.
1. Random Errors:
Error message: Various unidentifiable errors
Solution: Run npm cache clean and try the installation again. If you are still having errors with the npm install, use the –verbose option for more detailed error information.
2. No Compatible Version Found:
Error message: “No compatible version found”
Solution: Update to the latest stable version of NPM, as this error often indicates an outdated NPM version.
3. Permissions Errors:
Error message: “EACCES: permission denied”
Solution: Refer to resources on how to download and install Node.js and resolve EACCES permissions errors when installing packages globally.
4. NPM Login Errors:
Error message: “Login failed”
Solution: Ensure that the email address used during login matches the one registered on npmjs.com.
5. Disk Space Issues:
Error message: “npm ERR! Error: ENOSPC, write”
Solution: Free up disk space or set NPM’s tmp folder to a location with more space using: npm config set tmp /path/to/big/drive/tmp.
6. Git Errors:
Error message: “npm ERR! not found: git” or “ENOGIT”
Solution: Install Git if it’s missing, or ensure that your Git information is added to your NPM profile. You can update your profile information from the command line or the npm website. For more details, see “Managing your profile settings.”
7. Dependency Conflicts:
Error message: “Peer dependency conflicts”
Solution: Use npm install –legacy-peer-deps to bypass peer dependency issues or update the conflicting packages to compatible versions.
When npm install fails: Fast debugging checklist
Most npm install issues fall into a small set of causes. The fastest fix comes from checking them in a tight order, not guessing.
Start with your environment. Confirm Node.js and npm versions match what the project expects. A quick node -v and npm -v saves time, especially on older repos or CI runners. If the project pins versions, follow them. Mismatches often surface as opaque dependency errors.
Next, look at the lockfile. If package-lock.json exists, keep it. Deleting it can change resolved versions and introduce new failures. When installs behave oddly, try a clean state instead: remove node_modules, keep the lockfile, then run npm install again. This resets the tree without drifting dependencies.
Peer dependency conflicts are another common blocker. Newer npm versions are stricter here. If the error names incompatible peer ranges, fix the versions explicitly. Temporary flags like --legacy-peer-deps can unblock local work, but avoid them in shared environments unless you document why.
Network and registry problems are easy to miss. Corporate proxies, private registries, or a misconfigured .npmrc can break installs. Verify the registry with npm config get registry and test connectivity. Timeouts and 403 errors usually point here, not to the codebase.
Native modules deserve special attention. Packages with binaries depend on build tools. On macOS or Linux, missing compilers or headers cause install failures that look unrelated. On CI, this often appears after a base image change. The error log usually names the missing tool if you scroll past the noise.
If nothing stands out, increase signal. Run npm install --verbose and read from the first error upward. The initial failure is the cause; later messages are fallout.
Once installs are stable, monitor the dependency chain in production. Broken builds and failed deploys often start with a silent install issue. Catching them early reduces downtime and noisy rollbacks.
Summary
Installing a specific version of a package with NPM is a simple way to ensure compatibility and stability in your projects. By using commands like npm install [package]@[version], you can manage dependencies efficiently, whether rolling back to a previous version or installing a stable release. This practice helps avoid conflicts and supports smooth development workflows.
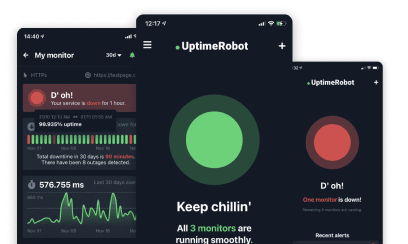
Once your dependencies are correctly managed, using uptime monitoring tools like UptimeRobot ensures your application is always live and responsive. This helps detect any unexpected downtime that might arise from changes in package versions.
For complete reliability, integrate UptimeRobot’s free uptime monitoring to keep your applications running smoothly. Get started today!
FAQ's
-
npm installdownloads the dependencies listed in yourpackage.json(orpackage-lock.json) and places them in thenode_modulesdirectory. If a lockfile exists, npm prioritizes it to ensure consistent versions across environments. This is why installs can differ if the lockfile is missing or outdated. -
Use
npm ciin CI/CD because it installs dependencies strictly frompackage-lock.jsonand fails if it’s out of sync. It’s faster and more predictable thannpm install, which may resolve newer compatible versions.npm installis better suited for local development. -
Slow installs are usually caused by network latency, large dependency trees, or native modules that require compilation. Clearing the npm cache, using a closer registry mirror, or enabling caching in CI can help. Also check whether optional dependencies or post-install scripts are adding overhead.
-
Permission errors typically happen when npm tries to write to a global directory without proper access. This is common when using sudo or system-wide Node.js installs. Fix it by using a Node version manager (like nvm) or adjusting npm’s global directory ownership.
-
This warning means package.json and package-lock.json don’t match. It often happens after manually editing package.json or resolving merge conflicts incorrectly. Run npm install locally and commit the updated lockfile to restore consistency.