Quick links
Status pages are one of the best additions to your monitoring that can significantly reduce the number of support tickets or improve the efficiency of your teams and processes.
There are multiple benefits hidden in creating a custom status page, so let’s take a look at all of them and how you can implement them immediately.
What is a status page?
A status page is a dedicated webpage that shows the current health of your software, including any ongoing or past incidents.
It serves as a communication tool for informing users about service disruptions, outages, or scheduled maintenance for websites or web apps.
Essentially, it’s a transparency feature that many online companies use to keep their users informed about the status of their services.
Top 5 status page benefits
Status pages play a critical role in both preempting and managing service interruptions.
They serve as a testament to your commitment to transparency, allowing your users to gauge the historical uptime and reliability of your services. This not only fosters trust but also sets clear expectations regarding your service level agreements (SLAs).
The key advantages of implementing a status page are:
- Boosting transparency and trust: By showcasing the reliability and performance of your services, you reassure users of your commitment to high-quality service delivery. This transparency is invaluable in building and maintaining trust with your user base.
- Streamlining incident management: A status page centralizes your communication, enabling you to post updates about any incidents from a single location. This eliminates the need to juggle multiple platforms for sharing critical information during downtimes.
- Enhancing social media response: Often, the first indicators of service issues surface on social media. A status page becomes a crucial tool in your social team’s arsenal, allowing them to provide immediate, informed responses to user reports of service disruptions.
- Automating incident reporting: Integration with monitoring platforms, such as Cronitor, allows for the automatic creation and resolution of incidents. This not only saves valuable time for your team but also ensures that the information on your status page reflects the most current state of your services.
- Reducing customer support queries: A well-maintained status page offers immediate answers to users experiencing service disruptions, potentially reducing the volume of direct support requests. This level of upfront transparency allows customers to find quick answers to their concerns, alleviating the pressure on your support team.
In essence, a status page is more than just a technical resource; it’s a strategic asset that enhances user experience, fosters trust, and streamlines communication during both peak performance and times of trouble.
TIP: Create your first status page for FREE with a lifetime free plan from UptimeRobot.
The different types of status pages
Status pages are an essential tool for communication during service disruptions, but not all status pages serve the same audience or purpose.
Broadly, they can be categorized into public and private status pages, each catering to different needs and scenarios.
Public status pages
Public status pages are designed to be accessible to anyone who has the link. However, by using a custom domain for your public status page it will be much easier to remember, for example, status.uptimerobot.com.
This makes them ideal for companies that serve a large user base or when the information being communicated is not sensitive.
These pages are about transparency and building trust with your users, providing real-time updates on service status, incidents, and maintenance schedules.
Private or internal status pages
On the other hand, private status pages are tailored for internal use.
TIP: Disallow search engines from indexing your status page in your status page settings. Just change the “robots meta tag” option to “noindex”.
Access to these pages is restricted through password protection, ensuring that only designated team members or specific clients can view them.
This exclusivity makes private status pages perfect for internal communication.
Different teams within an organization, such as development, support, and executive teams, can have their own dedicated pages that display information pertinent only to their roles and responsibilities.
The choice between a public and a private status page hinges on the audience you intend to communicate with and the nature of the information being shared. Public status pages foster transparency with your user base at large, while private status pages offer a secure channel for internal communication and sensitive information sharing.
Public or private SLA status page
SLA (Service Level Agreement) status pages, whether public or private, are essential for transparently communicating service performance.
Public SLA status pages offer transparency by sharing service level metrics like uptime and response times with customers and stakeholders. This openness helps manage expectations and builds trust by showing commitment to service quality.
For instance, a public page might display current performance indicators and historical data to assure users of reliability.
Private SLA status pages are designed for internal audiences or specific clients, focusing on detailed service performance metrics relevant to their needs.
Access is restricted, ensuring sensitive data remains confidential.
These pages might feature important details for different internal teams or client accounts, facilitating precise monitoring and management of SLA commitments.
How to create your first status page
Creating your first status page can take only a few minutes and cost you nothing. Sounds like it’s worth it, for the value it can bring you, right?
Let us help you create your first status page with a lifetime free account from UptimeRobot.
Creating a status page with UptimeRobot
The whole process will take you just a few clicks and all you need is an account registered with only your email address.
Here’s a straightforward guide to setting up a status page using UptimeRobot:
Step 1: Access your dashboard
Log into your UptimeRobot account and choose “Status Pages” within the left navigation menu.
Step 2: Create a status page
Select the “Create Status page” blue button to begin crafting your new status page.
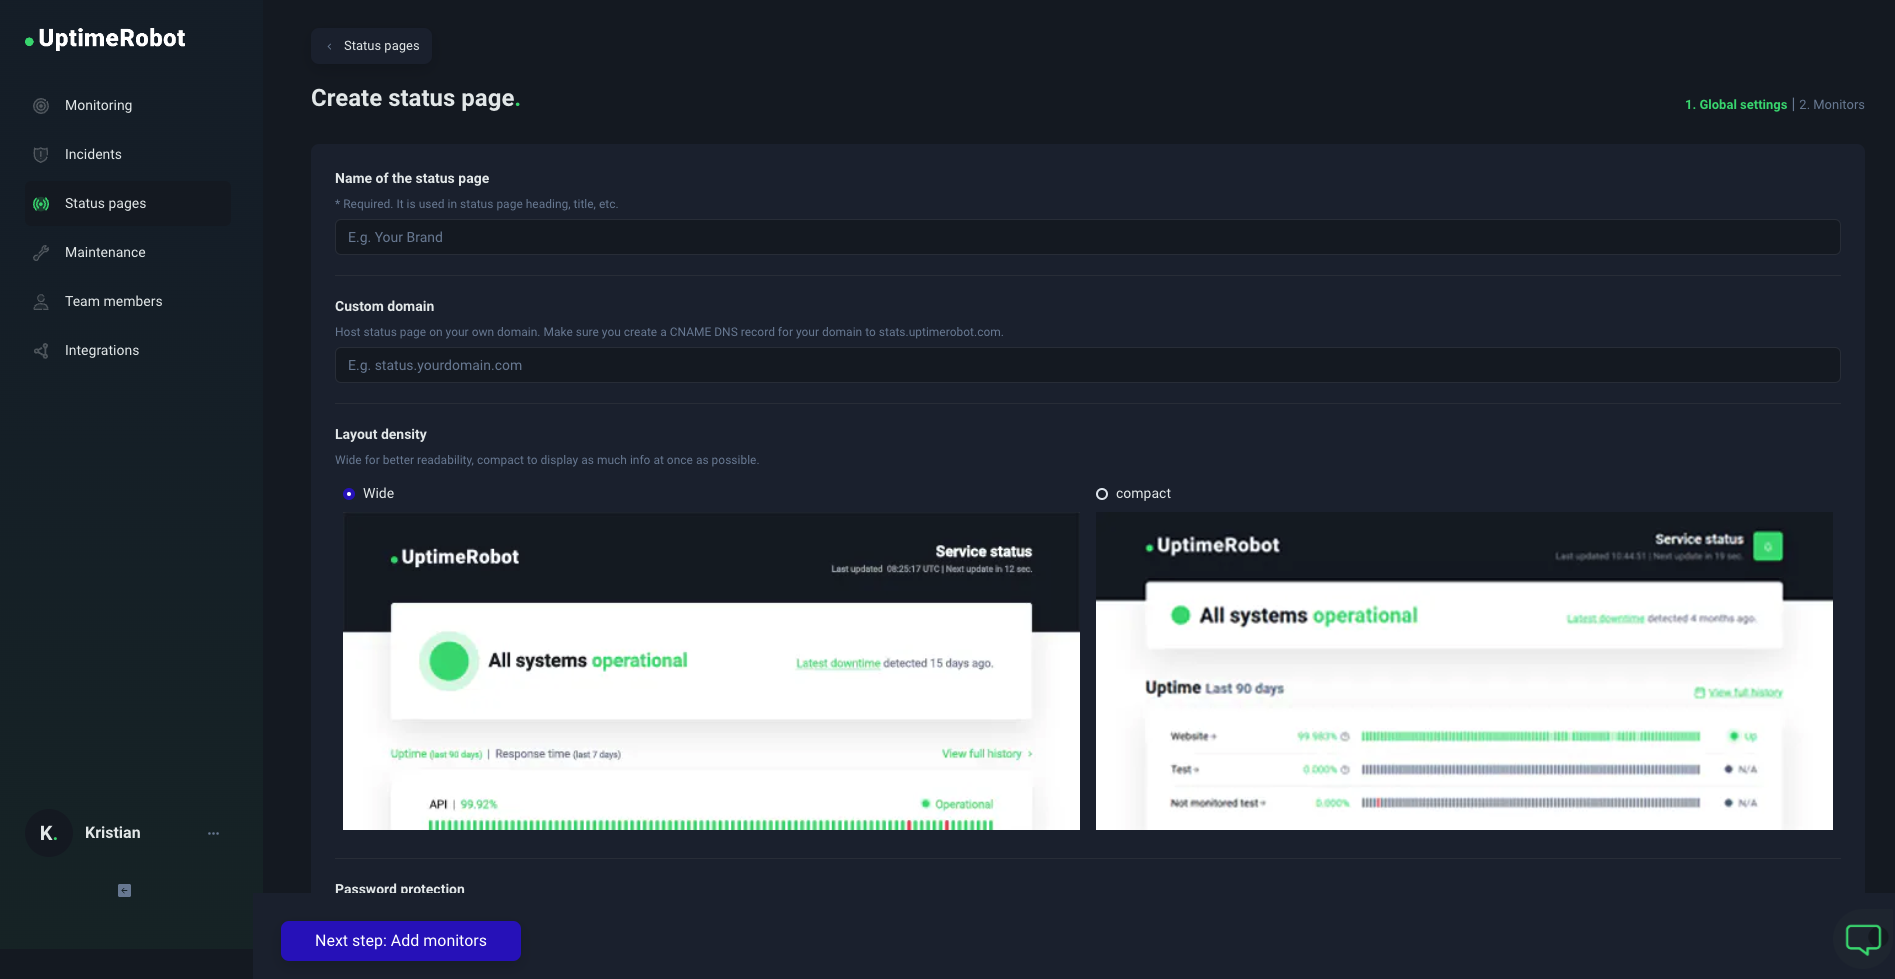
Step 3: Add all details
Start with the friendly name of your status page – this is how the status page will be shown in your dashboard.
Add a custom domain name if you want, choose the layout density, add a password if needed, and change the “Robots meta tag” option if you don’t want your status page to be indexed.
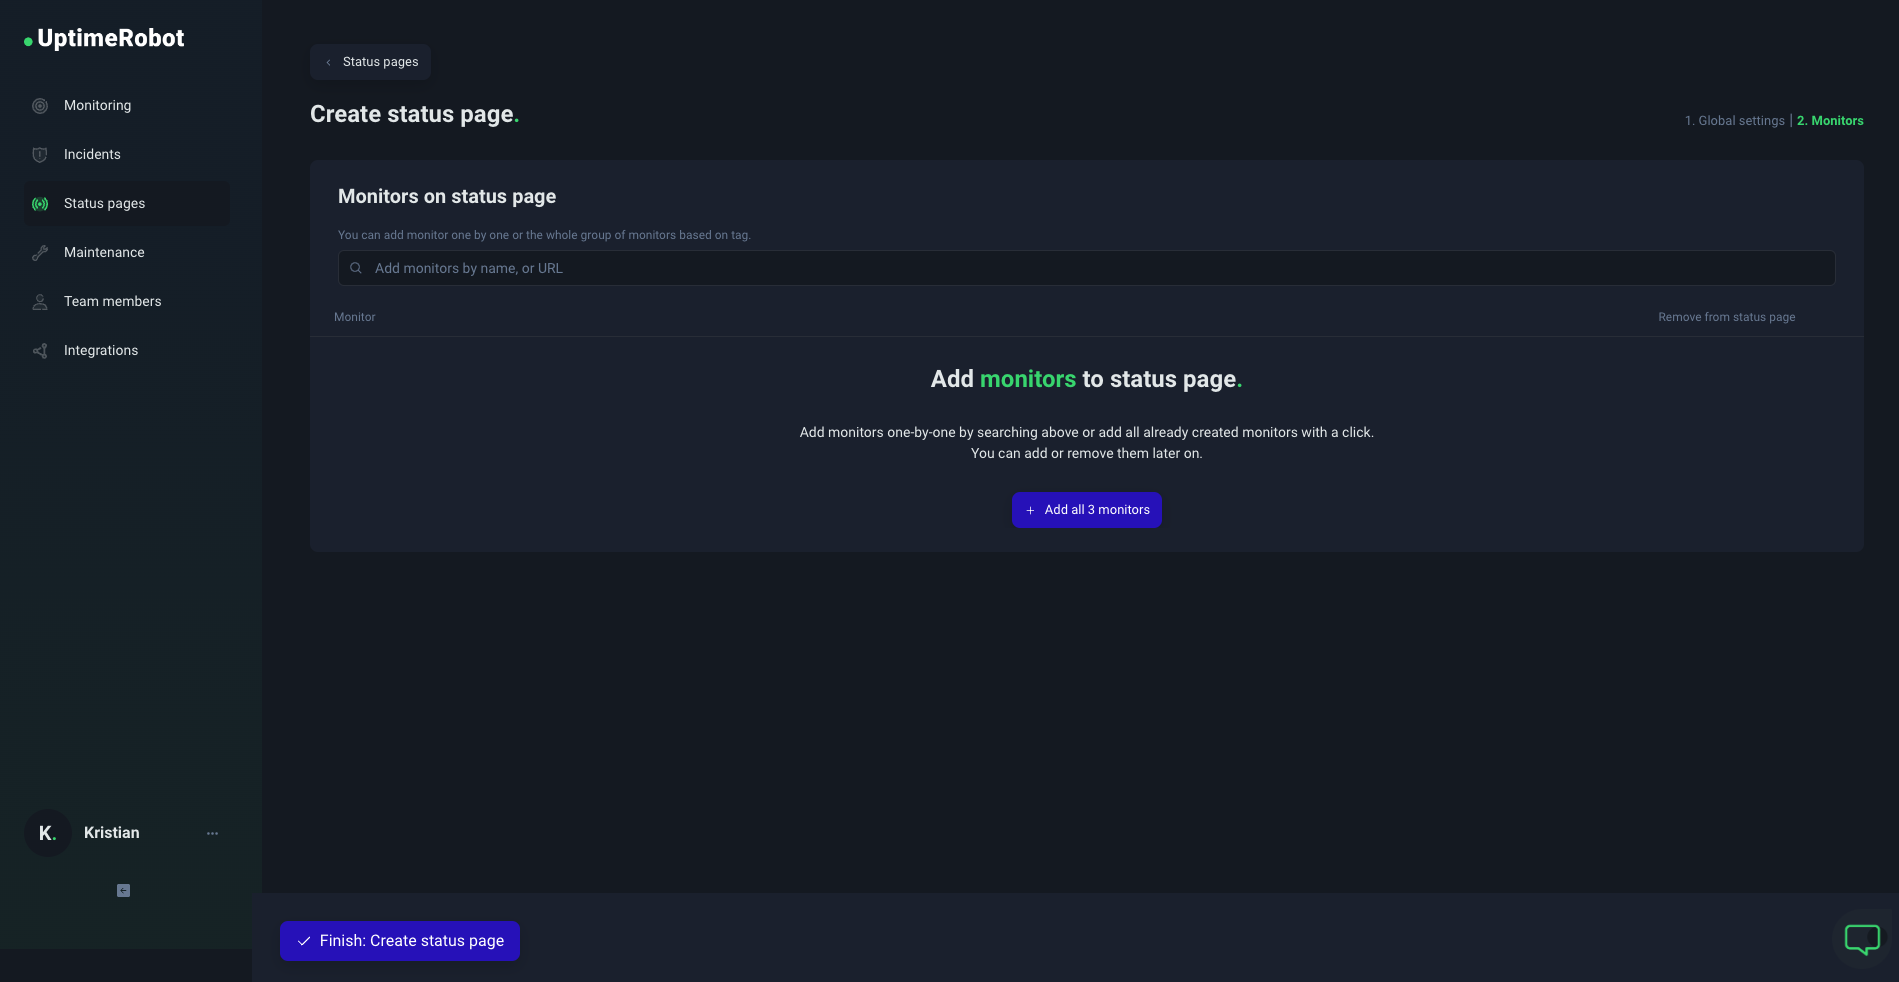
Step 4: Add monitors
Click on the blue button “Next step: Add monitors” below.
You can add your monitors one by one and search for them by name or URL, or you can simply add all your monitors with the “+ Add all 3 monitors” blue button in the middle.
Step 5: Activate your public status page
Finish the whole process with a final click on the blue button below.
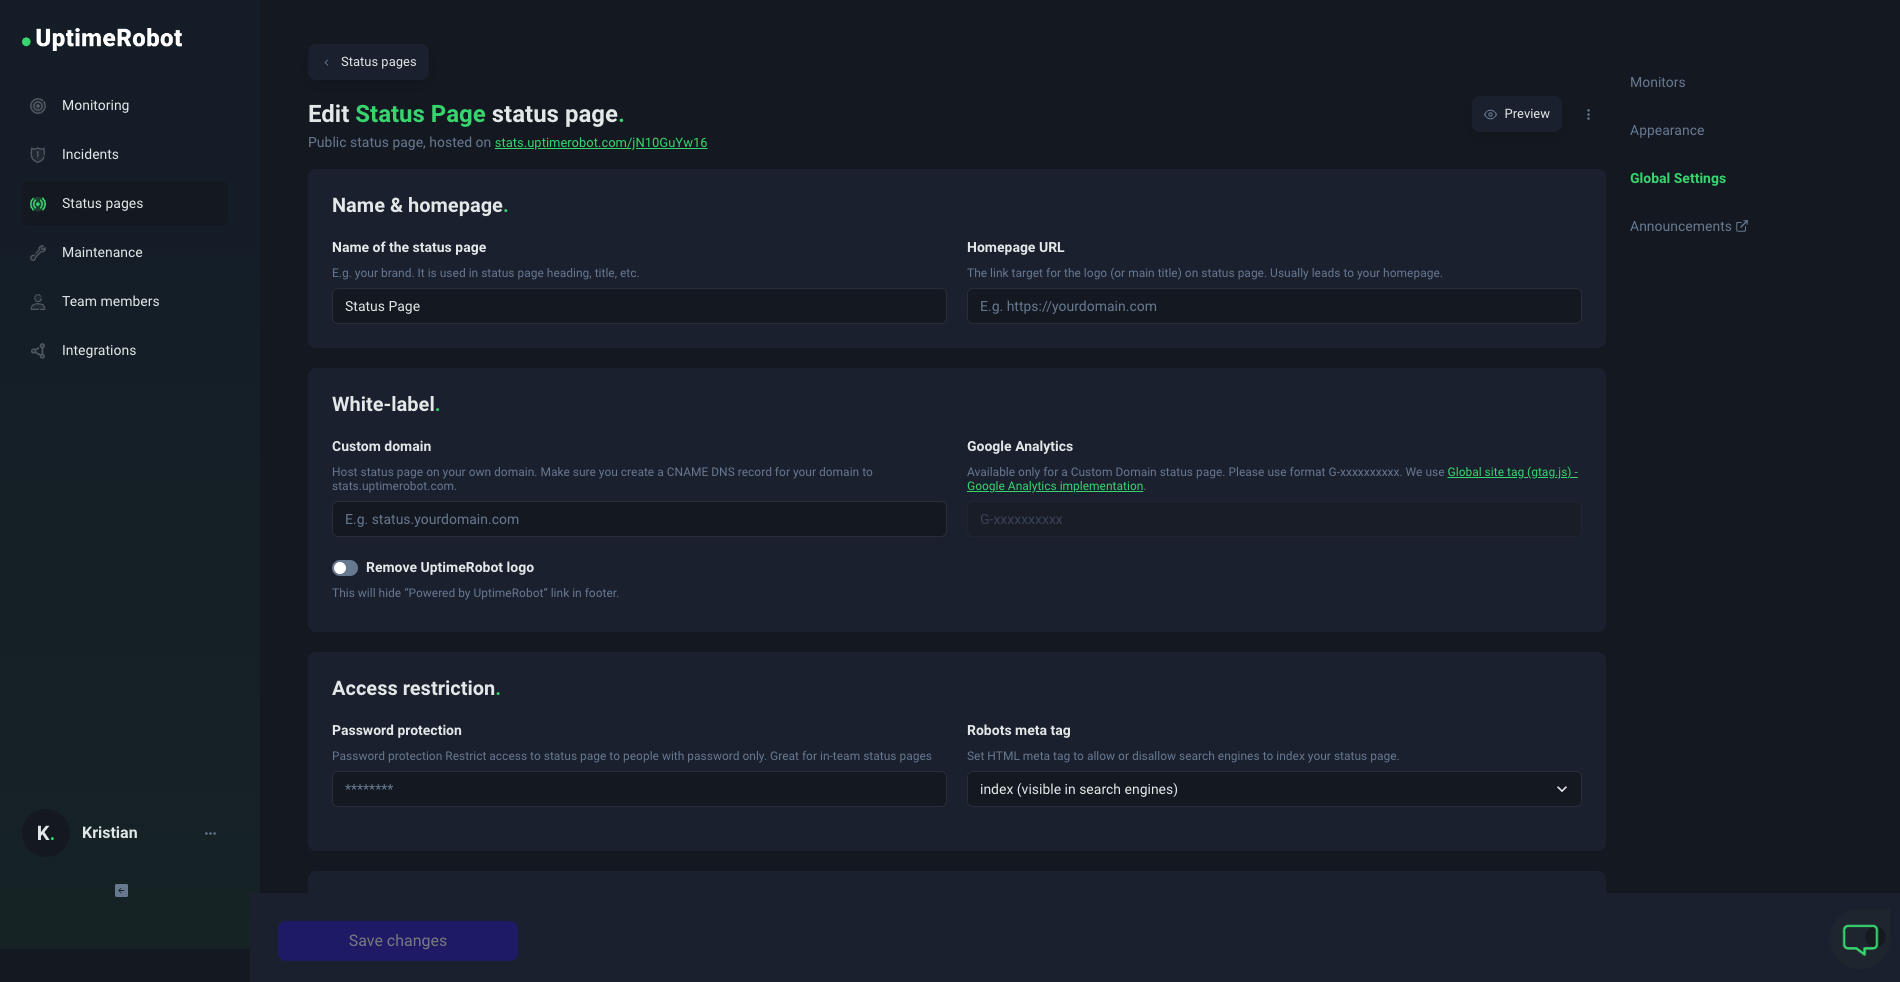
Now you should see a page with your status page settings (you can open them anytime easily by navigating to the “Status pages” option in the left menu, remember?).
If you don’t use a custom domain name for your status page, you’ll be able to get the URL of your status page here. By default, it should look like stats.uptimerobot.com/XXXXXX:
Status page tips & tricks
Creating a status page is the first step to building trust with your users, benefitting from fewer custom tickets, or improving your internal processes and incident management.
Here are some quick tips to get the most out of your status page.
✔️ Speak their language: Avoid technical jargon or internal categorizations that might alienate users if you’re creating a public page. Instead, describe services and components in plain language that reflects the user experience.
✔️ Enable email updates: Allow users to subscribe to updates. This option can be found in your status page settings under “Global settings” on the right and then “Features” > “Enable subscribe feature”.
This way, your users should be able to subscribe with their email to receive any updates you share on your status page.
Design
A well-designed status page strikes a delicate balance between simplicity and informative detail.
It’s a space where users should effortlessly navigate and grasp the current operational status of a service at a glance. Yet, this simplicity should not come at the expense of essential details that foster trust and transparency.
The ideal status page is one that integrates minimalist design with functional depth.
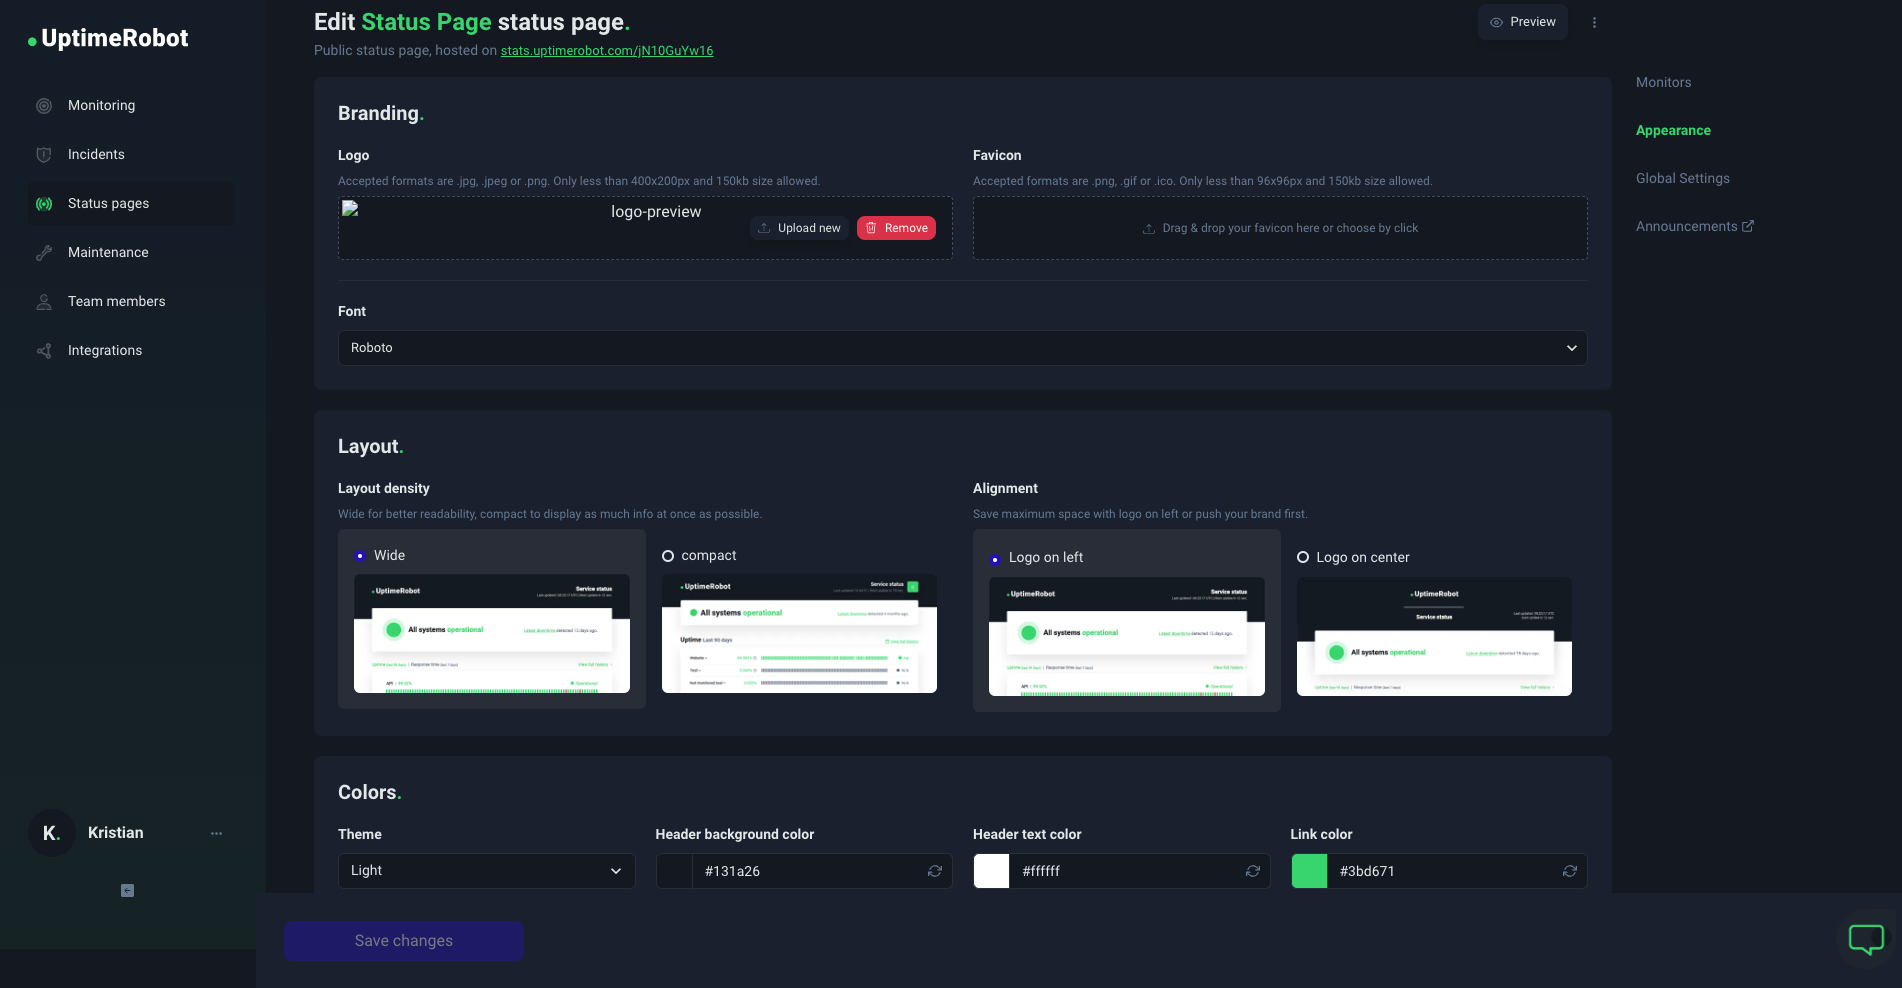
With UptimeRobot, you can customize the look of your status page and change your font, colors, logo, theme, and other details.
Choose the layout of your status page wide or more compact, change the alignment of your logo, or use the dark theme available.
Incident communication
When things go wrong, clear and concise communication can turn a potential PR nightmare into a display of competence and reliability.
It’s all about how you handle the situation.
The key is to keep everyone in the loop—be it your team, stakeholders, or customers.
Here’s the game plan:
- Acknowledge quickly: As soon as you’re aware of an incident, acknowledge it. A simple “We’re aware of the issue and are looking into it” can prevent a flood of queries and show you’re on top of the situation.
- Be transparent: Share what you know, even if you don’t have all the answers yet. People appreciate honesty and being kept in the know. It builds trust.
- Choose the right channels: Email, social media, your website—use the most effective channels to reach your audience. For serious incidents, a multi-channel approach is best.
- Keep it simple: Use clear, jargon-free language. Not everyone is a tech wizard, and clear communication ensures everyone understands what’s happening.
- Update regularly: Even if there’s no new information, a brief message to say you’re still working on the issue can go a long way in maintaining trust.
Real-time incident updates
In the heat of the moment, real-time updates can be a lifeline.
They not only demonstrate your commitment to resolving the issue but also help manage expectations.
Perhaps the most important rule is to be consistent. If you’ve promised updates every hour, stick to it. Consistency is key to maintaining trust and keeping everyone calm. And if you’ve identified the problem or ruled out potential causes, let people know. It shows that progress is being made.
Throughout the entire process, you should also make sure that the team members providing updates are knowledgeable about the incident.
Misinformation can do more harm than good.
Once the incident is resolved, provide a summary of what happened, how you fixed it, and what steps you’re taking to prevent future issues.
A comprehensive wrap-up can turn a negative experience into a positive one, showcasing your commitment to continuous improvement.
Include historic & post-incident data
Incorporating historical data and post-incident reports into your status page helps you create a narrative of reliability and transparency.
By showcasing past performance through a history of mostly successful operations (marked with more green indicators than red), users gain confidence in the robustness of your service. This historical context turns what could be perceived as a series of isolated incidents into a track record of overall stability.
Providing thorough debriefs on significant disruptions, especially those classified as critical, also helps explain what went wrong and what steps are being taken to prevent future occurrences.
This approach not only educates your users about the complexities behind maintaining a seamless service but also solidifies your reputation as a transparent and user-focused provider.
Test status page updates
Before launching your status page into the wild, it’s crucial to ensure everything works flawlessly—and this is where testing comes into play.
Navigate to the “Announcements” option on the right side of your status page settings and simply add a test announcement to see how everything works – you can always remove it easily.
If you want, you can also set the announcement to be shown on your status page (and sent to your subscribes) at a specific time. We recommend settings this to at least five minutes from the current time you’re currently testing it.
Best status page examples
There are many examples of good-looking status pages. We’ve picked the best three for you to get an idea of how your status page can look like.
For example, the video editing tool Kamua went for a minimalistic look with their logo and brand color used in the header. It uses the dark theme, too.
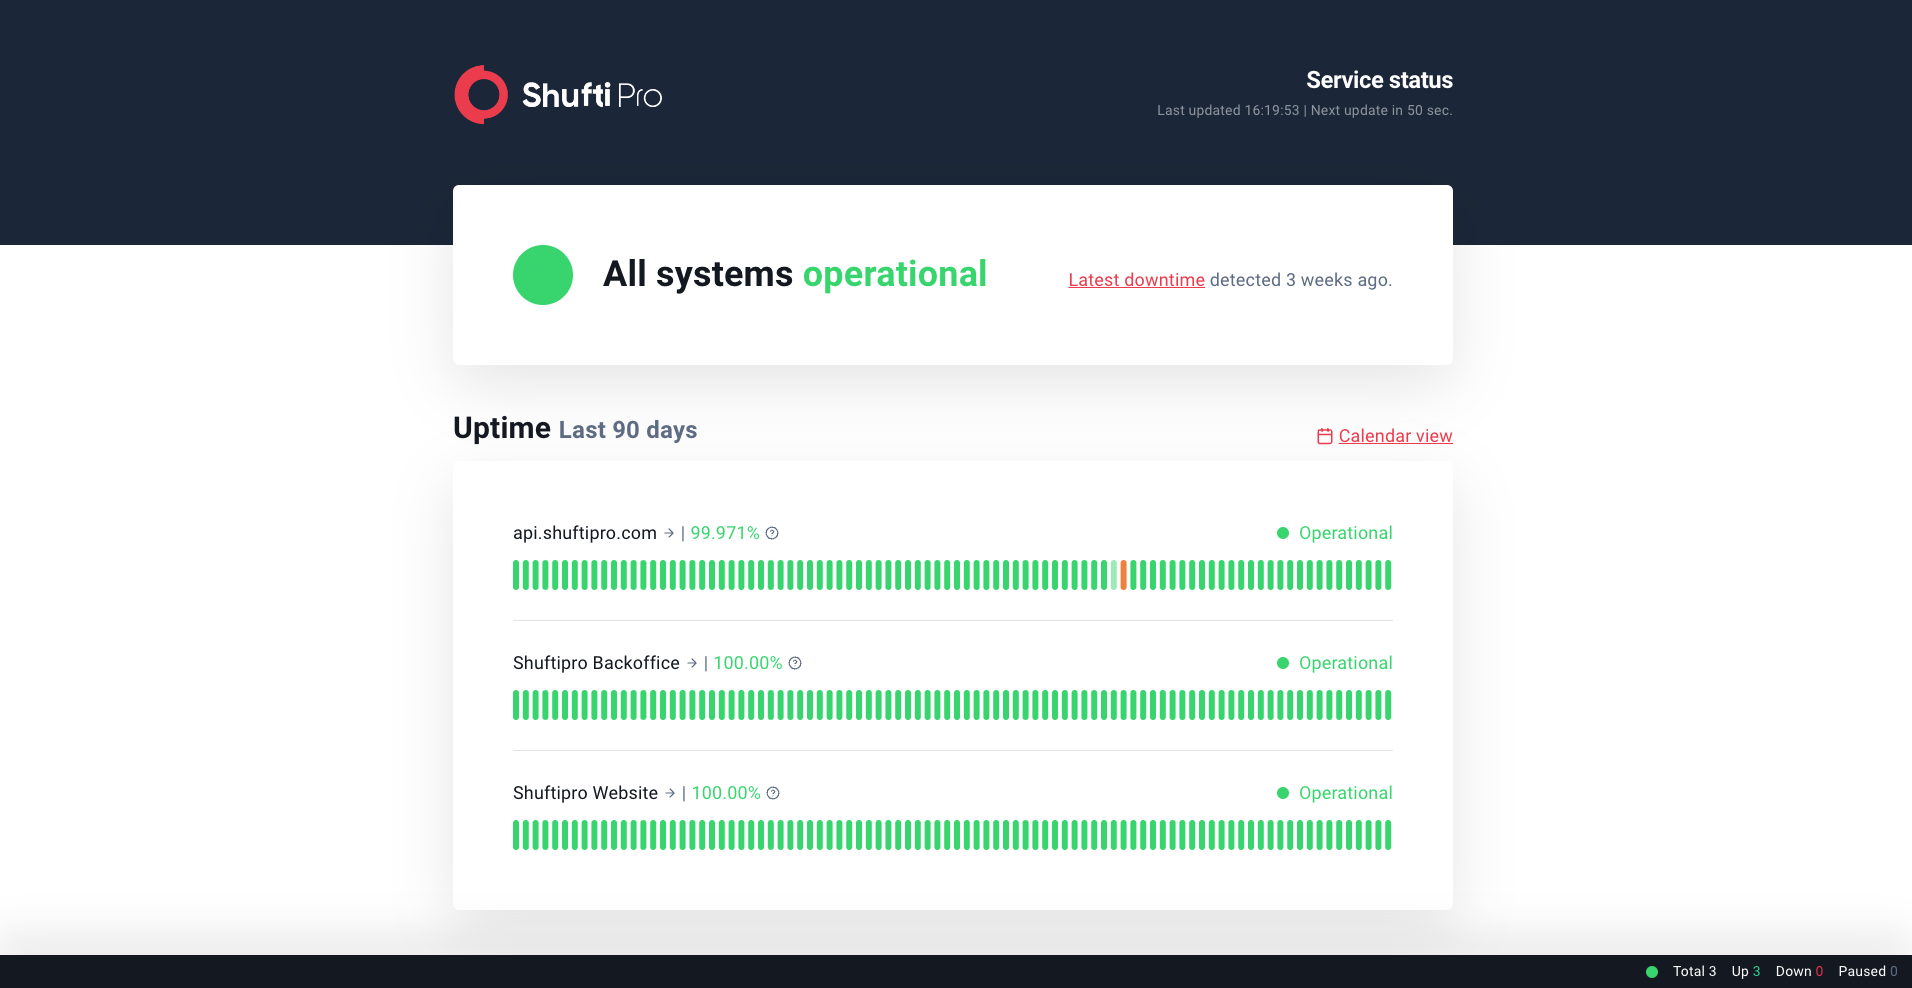
Similarly, ShuftiPro went for a minimalistic design with their own logo, using a light theme. Notice the floating status bar.
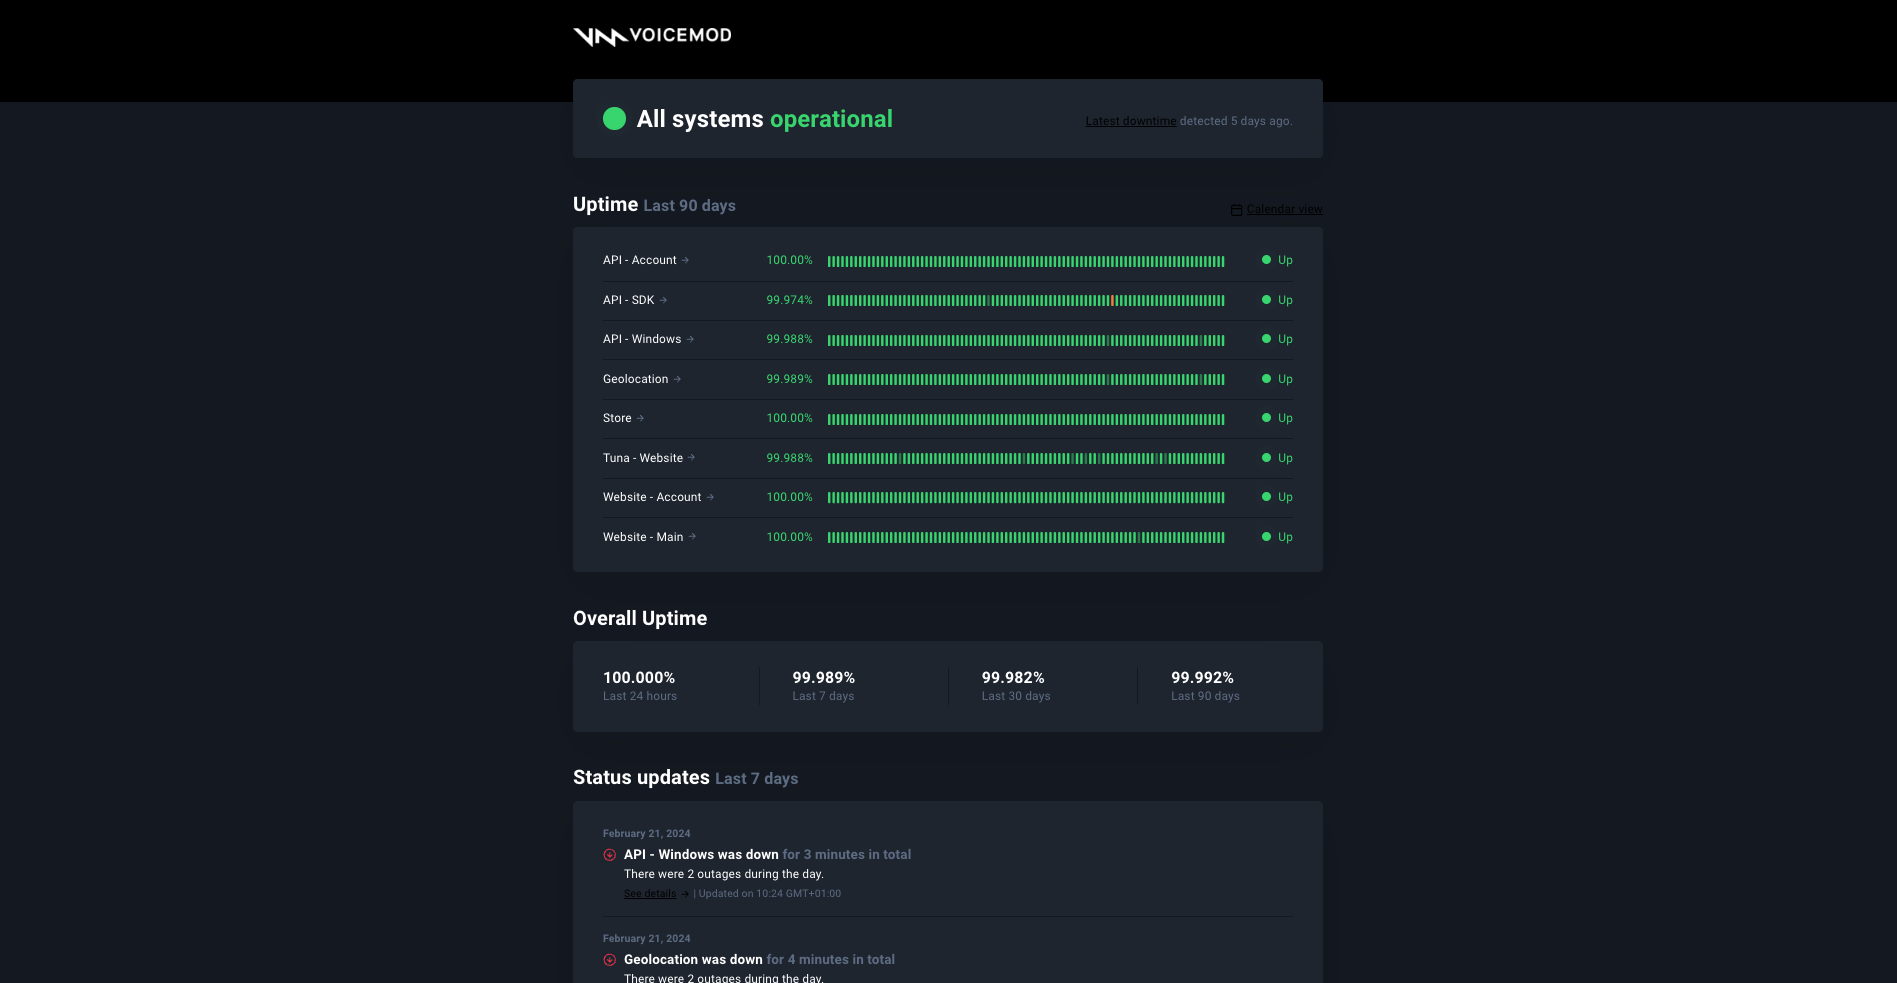
On the other hand, Voicemod is using a more dense dark-themed status page with a general uptime overview and status updates.
Get inspired or just take a look at what other status pages look like and check our article with 10 real status page examples like Apple, Cloudflare, or Netflix.
Free vs. paid status pages
When it comes to keeping your users informed about system status, choosing the right status page provider is crucial.
This choice involves balancing considerations such as features, cost, reliability, security, and support.
Let’s take a closer look at the differences between free (or open-source) and paid status page solutions to help guide your decision.
| Paid Status Pages | FREE Status Pages | |
| Cost | Starts at $7 / per month | Free |
| Features | Custom domain and password | Basic features |
| Customization | Logo, font, colors | Limited |
| Number of monitors | 3, 100, or more | 1 |
Considering the effort involved in building and maintaining a custom status page, many find the convenience of a paid service well worth the investment.
Conclusion
A well-structured status page can help guide users through the stormy seas of service disruptions with clarity and confidence.
And as a business owner, providing real-time updates ensures that your communication strategy is robust, empathetic, and user-centric.
By adopting best practices in crafting incident reports, offering real-time updates, and diligently testing your status page, you’re not just managing a crisis—you’re enhancing your brand’s reputation and fostering a loyal user base.
Create your first status page or upgrade your current one to maximize the benefits!



4 replies on “A Comprehensive Guide to Status Pages in 2024”
great feature but still missing API integration as stated here: https://uptimerobot.nolt.io/77
Please add proper API integration to make this feature complete. Thanks
I’ve just found this blog and I think it’s very informative. After I’m done reading this article I will read more for sure. Thanks
I want to set up status.MYDomain.com that routes to UptimeRobot
We are in AWS. I assume all I need to do is set up a CNAME in RT53 that points to an UptimeRobot endpoint.
What I don’t know is if that endpoint only provides the STATUS page.
I do not what there to be any public login into UptimeRobot from status.MYDOMAINs.com .
I understand that a “letsencrypt” entry needs to be made in RT53
Lastly, what plan do I need to use branded status page?
Hi Kevin,
regarding the CNAME yes, that’s right. Regarding > I understand that a “letsencrypt” entry needs to be made in RT53, you should disable the SSL management for this subdomain, we’ll handle SSL for you.
If you don’t want your status page to be public, you can set up a password for it in your dashboard.
And if you wish to customize your status page, any of the paid plans is enough, you can see the details here > https://uptimerobot.com/pricing/
If you need further help with any of these details please start a live chat with our support or send us an email and we’ll be happy to help.