Adding a monitor is easy. Keeping track of 100 client websites takes more thought.
Which sites belong to which client? Who gets the alert when a store goes down? Can a client check their service status without seeing another company’s systems?
For agencies, hosting providers, and managed service providers, those questions are part of the setup. A consistent approach saves time during onboarding and makes the account easier to navigate when something breaks.
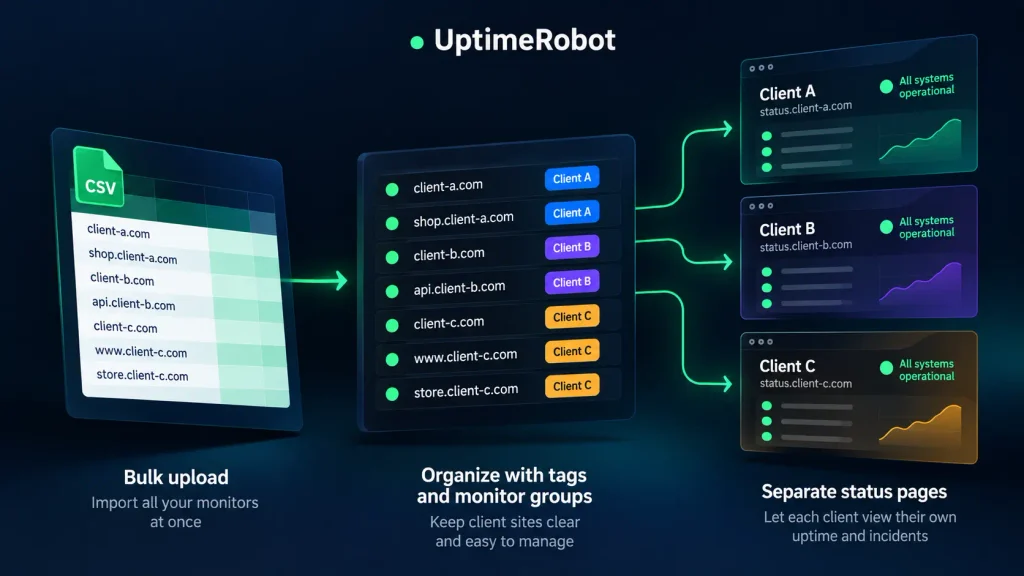
Here’s a practical workflow using UptimeRobot’s Bulk Upload, tags, monitor groups, and status pages.
1. Build a client inventory before importing
Start with a list of the services you’ve agreed to monitor. Include the client, service, environment, monitoring target, and person responsible for responding to alerts.
A small inventory might look like this:
| Client | Service | Environment | Monitoring target | Alert owner |
| Acme | Website | Production | Homepage URL | Agency support |
| Acme | Store | Production | Store URL | Ecommerce team |
| Acme | API | Production | Health endpoint | Development team |
| Acme | Website | Staging | Staging URL | Development team |
| Beta | Website | Production | Homepage URL | Agency support |
Choose targets that reflect what you need to know. A working homepage doesn’t prove that checkout works, and a reachable API endpoint doesn’t necessarily confirm that its responses are correct.
If you need to check the responses themselves, consider API monitoring. Record what each check is intended to verify.
Keep this inventory separate from the upload template. Your inventory can hold ownership notes and client requirements, while the import file should follow UptimeRobot’s expected format.
Before proceeding, compare the list with your existing monitors. An accidental duplicate can create extra alerts and leave your team unsure which monitor to maintain.
2. Choose names your team can recognize in an alert
Decide on a naming convention before creating the import file.
A useful format is: Client – Environment – Service
For example:
- Acme – Production – Website
- Acme – Production – Store
- Acme – Production – API
- Acme – Staging – Website
- Beta – Production – Website
The client name makes ownership obvious, the environment helps someone distinguish a production incident from a staging issue and the service name tells them where to start investigating.
Keep names readable and consistent. If one person uses “Production,” another uses “Prod,” and a third leaves the environment out, the account becomes harder to scan.
Also, write names with clients in mind. Friendly names can appear on status pages, so avoid internal shorthand that will mean nothing to the people reading them.
3. Bulk upload your monitors
UptimeRobot’s Bulk Upload feature lets you create multiple monitors from a prepared file.
To get started:
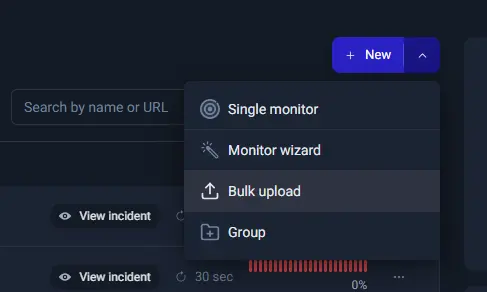
- Click the +New icon in the dashboard and select Bulk Upload.
- Download the current template.
- Fill in the monitor details using the template’s columns and instructions.
- Upload the completed file.
The documented fields include monitor type, URL or IP address, interval, friendly name, tags, and the settings needed for keyword or port monitors. Monitoring intervals are entered in seconds, and the shortest interval available depends on your plan. Multiple tags are separated by semicolons.
The template covers HTTP, Ping, Port, and Keyword monitors. Other types, such as heartbeat or API monitors, need to be created separately.
For example, a Tags cell could contain:
client-acme;production;website;critical;status-acme
The last tag marks the monitor for the client’s status page. Step 6 explains why that’s worth doing at import time.
Use the dashboard’s current template as your source of truth for column names and accepted values. Don’t upload your full client inventory unchanged.
For your first import, try a small batch. Check the resulting targets, names, intervals, and tags before uploading the rest. If an upload reports a problem, check which monitors were created before retrying.
Afterward, compare the imported monitors with your inventory. A successful upload still needs a coverage check.
4. Use groups for clients and tags for filtering
For an agency account, one group per client is a straightforward starting point. Tags then describe details that cut across those clients.
UptimeRobot supports multiple tags per monitor, while each monitor belongs to one group. Tags are available on all plans; monitor groups need a paid plan. Our guide to tags and monitor groups explains how to manage both.
The upload template doesn’t include a group column. After importing, select each client’s monitors and use Bulk Actions to move them into that client’s group. Filtering by the client tag makes the selection quick.
Here’s a structure you can reuse:
| Organizing method | Example | Purpose |
| Client group | Acme | Browse one client’s monitors together |
| Client tag | client-acme | Identify the client when filtering |
| Environment tag | production | Separate live services from test systems |
| Service tag | website | Find similar checks across clients |
| Priority tag | critical | Identify services needing urgent attention |
| Publication tag | status-acme | Mark monitors approved for the client’s status page |
Keep the vocabulary short. Choose production or prod and use it consistently.
Also, document what priority labels mean. A critical tag can help your team find important services, but adding that label alone doesn’t establish who gets notified or how quickly someone responds. Configure those settings separately.
5. Set alert ownership before calling onboarding complete
A monitor only helps during an outage if the right person receives its alert.
For each client, agree on:
- Who receives production downtime alerts.
- Who covers incidents outside normal working hours.
- Whether the client receives alerts directly, for example through a notify-only seat, or gets updates from your agency.
- Which team handles staging and development issues.
Then, check that the monitor settings match those decisions.
Bulk Actions let you update notification settings, tags, intervals, and other supported settings across selected monitors. This is useful when several services share the same support team.
Review the selection before applying changes. Updating one client’s notification settings should be a deliberate action, especially in an account containing many similar monitor names.
Confirm delivery to the intended recipients as part of onboarding. Don’t wait for a client outage to discover that notifications are going to a former employee.
6. Create a focused status page for each client
A client status page should make it easy to answer, “Are our services working?”
For our pretend company Acme, that might mean showing the website, store, and API. Staging sites, temporary test monitors, and unrelated client services can stay out of view.
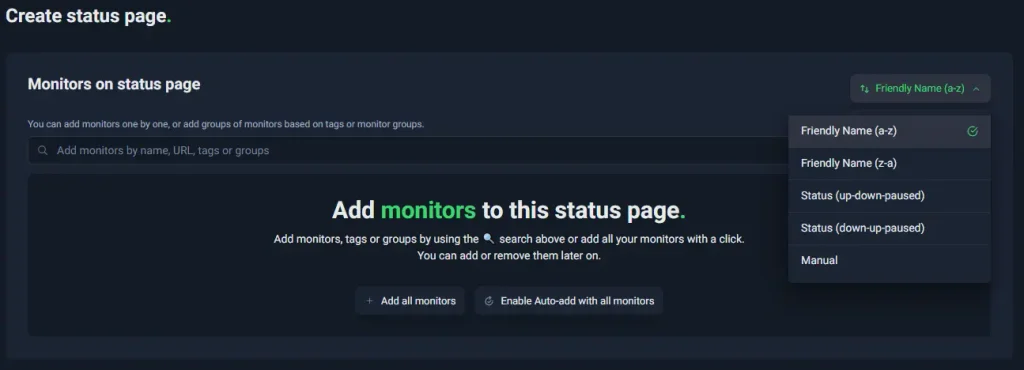
When building an UptimeRobot status page, you can select monitors individually or add related monitors using tags.
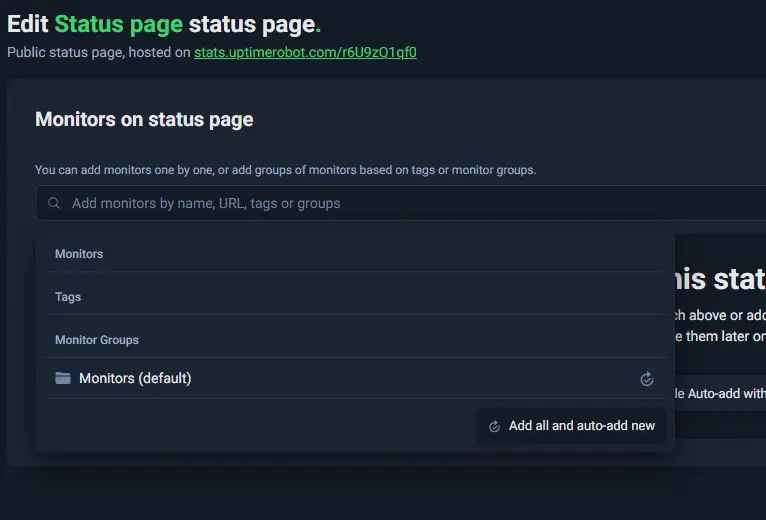
Be careful when using a broad client tag. If client-acme is attached to both production and staging monitors, selecting it can bring in services you didn’t intend to show.
That’s why the publication tag matters. Add status-acme only to monitors approved for that client’s page, ideally at import time, and select the page’s monitors by that tag.
If your clients expect their own branding, Team plans and above support custom domains and white-labeled status pages, so the page can look like part of the client’s own site.
Before sharing the page, review it as a client would:
- Are all listed services relevant?
- Are the names understandable?
- Have staging and internal checks been left out?
- Is anything from another client visible?
- Are the most important services easy to find?
Whenever you add a new monitor, check whether it belongs on the status page and confirm the page’s actual contents. Treat that review as part of the change.
Decide whether the page should be public
A dedicated client page isn’t automatically private.
If the information should be limited to selected viewers, UptimeRobot supports password-protected status pages. Check the available options and your plan’s status page allowance before promising a particular setup to every client. The number of status pages varies by plan, from 1 on Free to 100 on Team.
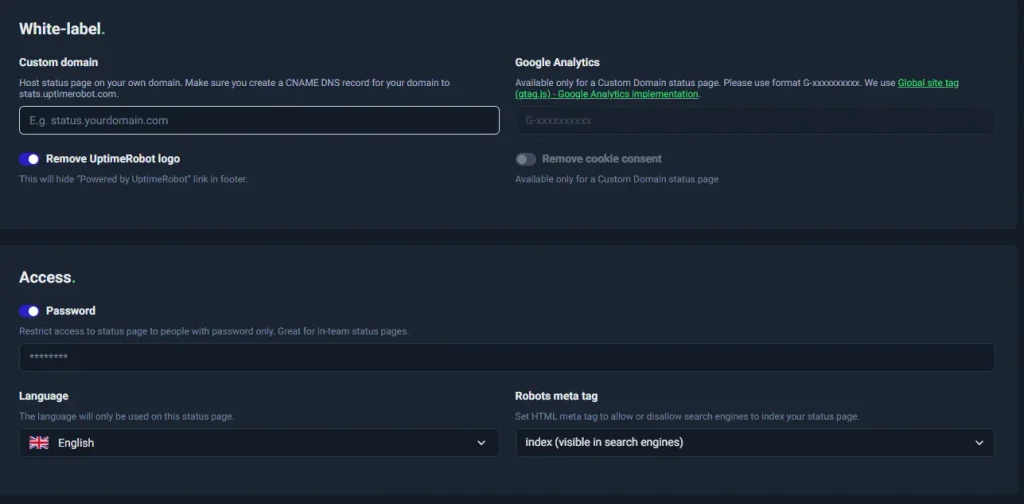
A status page can give clients visibility without providing access to your monitoring dashboard. Agree on the audience before distributing the link.
7. Make future changes part of the same workflow
The initial import is only the beginning. Clients launch new sites, replace domains, change support contacts, and retire services.
Use the same process for each addition: update the inventory, apply the naming convention, assign the group and tags, configure alerts, and review status page inclusion.
Keep a named owner for each client’s monitoring setup. That person doesn’t have to handle every incident, but they should make sure the records and settings stay current.
If you onboard clients often, the UptimeRobot API can automate parts of this workflow, including creating monitors and managing groups.
When a client leaves, review their monitors, notification recipients, and status page access together. Confirm any reporting or handover needs before removing monitoring data.
Common mistakes to avoid
- Importing first and organizing later. Agree on names, tags, and ownership before the first large upload. It’s easier to reuse a clear structure than to repair hundreds of inconsistent entries.
- Monitoring only the homepage. Match your checks to the services you’ve agreed to cover. A green website monitor may tell you little about a separate store or API.
- Using a client tag as the only status page selection rule. Client ownership and suitability for publication are different decisions. Review every service you expose.
- Assuming tags configure alerts. Labels help organize monitors. Notification settings determine who hears about an incident.
- Forgetting to reconcile the import. Compare the result with your inventory so missing targets and duplicates don’t become permanent.
Agency monitoring checklist
Before marking a client’s setup complete, confirm that:
- Every agreed service has the intended monitoring coverage.
- Imported targets and settings match the inventory.
- Monitor names follow the agency’s convention.
- Groups and tags identify the correct client and environment.
- Alerts reach the people responsible for responding.
- The status page shows only approved services.
- Public or password-protected access matches the client’s expectations.
- Someone owns future updates to the setup.
One structure for every client
Bulk Upload makes the first import quick. What keeps a multi-client account manageable is the structure around it: consistent names, a small tag vocabulary, clear alert owners, and status pages that show only what each client should see.
Start with one client. Verify the import and alert delivery, and review their status page. Once that setup works, use it as the standard for the rest of your portfolio.
UptimeRobot’s Team plan includes up to 100 status pages, with password protection and white-labeling for client-facing pages. Start monitoring for free, or compare plans to find the right fit for your portfolio.
-
Yes. Use Bulk Upload and the current template from the UptimeRobot dashboard. Check a small batch before importing a large client portfolio.
-
Yes. The template supports tags, with multiple tags separated by semicolons.
-
A monitor can have several tags but belongs to one group. For agencies, client groups provide a convenient browsing structure, while tags help classify environments, service types, and priorities.
-
Yes, subject to your plan’s status page allowance. Choose the relevant monitors for each page and review its contents before sharing it.
-
No. A status page can show the services they care about without giving them access to your internal monitoring account.